The Bulk Content page can be used to create a large number of new articles by combining content from different sources and then post them to your weblogs. The page is split in three different sections, which can be accessed at the top by clicking on the tabs, and which should be used chronologically i.e. starting with the first and finishing with the third.
1. Build Content
The first tab is where you create the actual content. All content you fetch here is first of all only saved and displayed inside CMS Commander – it does not get posted to your websites immediately. Before doing that in the last step you can review, extend and modify it.
Please note that before being able to retreive content you have to choose the sources you want to use on the “Choose Sources” page and then configure their settings there.
When first navigating to the “Bulk Content” page you will only see a dropdown asking you “What do you want to do?” The choices are (if you dont see one of the options you need to activate that source on the “Choose Sources” page first):
- Create API Content for fetching content from the supported APIs i.e. Youtube, Amazon, ebay, Linkshare, etc. After selecting this option you need to enter a keyword, the number of items you want to fetch and select the exact content source from the ones you activated on the “Choose Sources” screen, which you want to use. After selecting the source its settings from your “Options” page will be displayed below and you can edit them to override the defaults or select a different template – changes will not be saved permanently.
- Upload a Datafeed for uploading and importing a .csv datafeed file. After selecting this option click on the new “Search” button to select the .csv file on your computer. You can also change the number of items from the feed you want to have parsed.
- Upload PLR articles for importing PLR articles in .txt format. After selecting this option click on the new “Search” button to select the text files you want to import from your computer. In order to be able to select multiple files at once you need a recent version of a modern browser like Mozilla Firefox.
- Parse RSS Feeds for importing RSS feeds from other websites. After selecting this option a text field will be displayed where you can enter the feeds you want to import, one per line.
If this is not the first time you fetch content in this session, i.e. there is already content displayed in the review section below, there will be an additional setting which lets you choose where to place the newly imported content: You can either add it as new articles, place it at the beginning at the current articles or at the end of the current articles in the review section.
If you chose to add the new items to the beginning or end of the current articles but the number of items you import this time is greater than the number that currently exists items will get added twice. For example if you have 10 Youtube videos imported before and they are no displayed in the review section and now choose to import 20 Amazon products and add them to the end of the current content then 2 Amazon products will be added to the end of each video.
When done with the settings click “Go” to fetch the content. The results will immediately be displayed in the “Content Review” section below. They are not posted to your site yet – before doing this in the later steps you can:
- Repeat the steps above to add more content to the current articles. By doing that you can create interesting combinations of the many different sources CMS Commander supports to forge good content for your websites.
- Review the results and use the “Delete This” link next to each article to remove it.
- If you have set up rewriting APIs on the “Choose Sources” you can use them to rewrite an article by clicking the respective link next to it.
- By clicking “Go to Editor” next to an article you can go to the main Content Editor and modify it there.
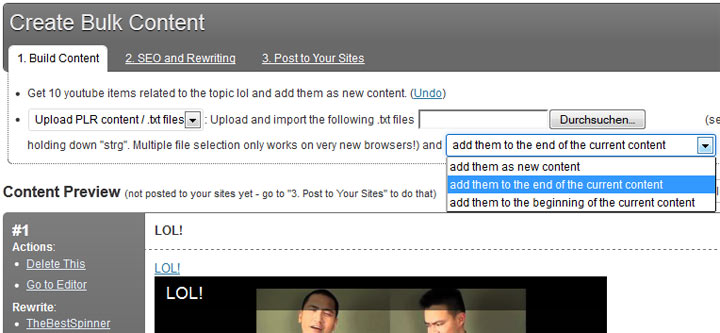
Bulk Content page with first tab selected.
2. SEO and Rewriting
This tab gives you several choices to SEO optimize the articles displayed in the “Content Review” section. Here you can bulk rewrite all the content at once with one of our supported APIs, strip all links from the articles before publishing them or choose to parse spin tags.
3. Post to Your Sites
When you are satisfied with the articles in the “Content Review” section you can publish or schedule them on your WordPress weblogs here.
On the top of the tab you find two small forms to do the following:
- The left form lets you assign a random author to each of the articles. To do so you need to generate a number of random new user accounts through CMS Commander first.
- The right form lets you assign a random post date to each of the articles which can be used for backdating or scheduling the articles.
Below this you can find another form where you have to enter your desired “Post Settings” to use in your WP blogs, which includes the category to assign to the articles as well as the author (in case you did not set a random author for each post, see above). To make the selection easier you can load the available settings from one of your sites by clicking the “Load Content” button next to it in the “Your Sites” list.
After that you can finish content creation by selecting the sites you want to post the articles to in the “Your Sites” list and then click on “Post to Selected Sites”.
If you have added “Post via Email” sites you also have the choice to post to them here by selecting them on the right side and clicking the “Post via Email” button instead.
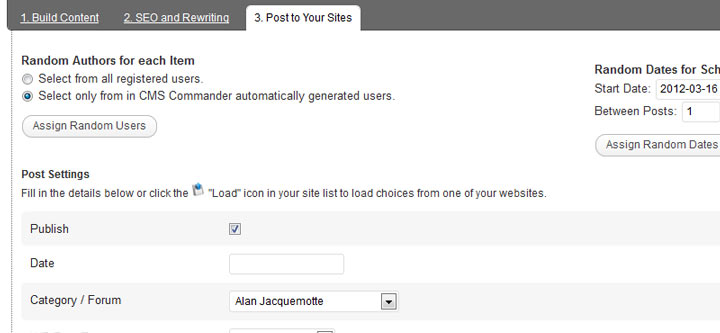
Bulk Content page with third tab opened and Post settings loaded from a WordPress site.
Join Over 3,000 Other Commanders!
Sign up now to start managing all your blogs immediately.
Completely free for 30 days. No payment details required!