With CMS Commander you can install a WordPress plugin to multiple websites in less than a minute. You can also activate, deactivate, delete and update plugins on all your websites at the same time. To do so go to the “Plugins” page in your account’s main navigation.
On the CMS Commander “Plugins” page you can remotely manage plugins on all your websites at the same time. That includes activating and deactivating used plugins, installing new plugins on several sites and updating all plugins at the same time. This article refers only to plugins, see here for managing and updating themes with the “Themes” page.
Manage WordPress Plugins
The “Plugins” page is split into two tabs which you can choose at the top of the page. On the first “Manage Plugins” tab you can review, delete, activate and deactivate plugins on your websites as well as copy plugins from one site to all others.
When first visiting the page you will see a list of installed plugins loaded from your default site set in CMS Commander. You can change the default site on your “Dashboard” page. To load the list of plugins from any other of your blogs click on the “Load Content” button next to its URL in the sitelist to the right of the screen.
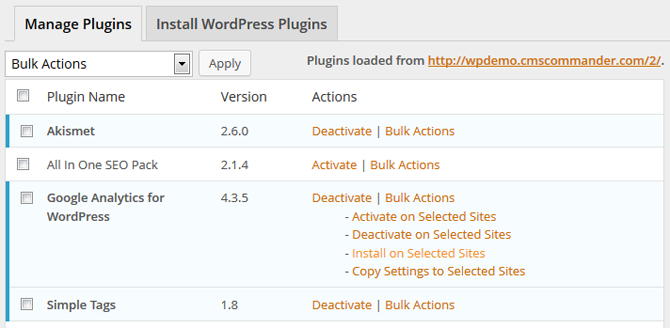
Plugins activated on the blog are marked with a blue background. Next to each plugin you can find an “Activate” link or “Deactivate” link. Clicking it changes the status of this plugin on the blog the plugin list was loaded from.
Next to the “Activate / Deactivate” link there is a “Bulk Actions” link. Click it to open up a choice of bulk actions you can perform with this plugin on any number of your blogs. The choices are:
- Activate the plugin on multiple blogs simultaneously.
- Activate the plugin on multiple blogs simultaneously.
- Copy the plugin and install it on any number of other blogs.
To perform a bulk action for a plugin on multiple of your blogs:
- Click on “Bulk Actions” next to the plugin of your choice.
- Select the blogs you want to affect in the sitelist to the right by checking the box next to their name. Or check “All Websites” to affect all your blogs.
- Click on the bulk action link of your choice.
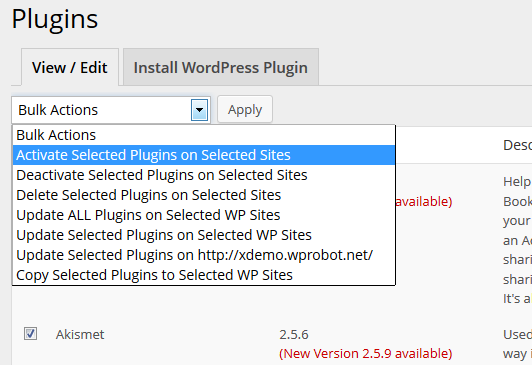
There is also the possibility to perform actions for multiple plugins on multiple sites. To do that you need to use the dropdown field that reads “Bulk Actions” right above the table listing your installed themes. The process is almost the same: Select the action of your choice in the dropdown box, check the sites you want to perform the action on as well as the plugins and then press the “Apply” button.
Updating All WordPress Plugins
The feature to update all WordPress plugins on your blogs has been moved to the “Dashboard” page. There you can update plugins as well as themes and WordPress itself on all your websites with only a few clicks. See the article “Using the Dashboard” for details.
Activating A WordPress Plugin On Multiple Weblogs
To activate a WordPress plugin first choose all the sites you want to make the new plugin active on by checking the box next to them in the list. After that click on “Bulk Actions” next to the plugin of your choice and then press “Activate Plugin on Selected Sites”.
You can also use the dropdown box above the plugins table to activate multiple plugins on all your blogs. Choose “Activate Selected Plugins on selected Sites” from the “Bulk Actions” drop down menu and then choose all the sites you want to activate the plugin on in the list to the right. Finish the action by pressing the “Apply” button next to the dropdown.
Installing A WordPress Plugin On Many Sites
To bulk install WordPress plugins to multiple WordPress weblogs navigate to the “Install Plugin” tab at the top of the page. CMS Commander gives you four choices from where to install the new plugin:
- From Favourites: Select and install plugins from the favourites you have saved in CMS Commander. Once you have created a list of favourites this is the quickest and easiest way to bulk install plugins to a new WordPress weblog. Because of that it is recommended that you save all plugins you regularly use as favourites for easy access later on.
You can add a plugin as favourite on all three other installation choices, “From WordPress Plugin Directory”, “From URL” as well as “From Your Computer”. On each of the choices tabs you can find a link or checkbox to mark a plugin as favorite. Favorites selected on the “From Your Computer” will be uploaded and stored (but not shared with anyone else) in CMS Commander to allow you easy access. - From WordPress Plugin Directory: Search the thousands of plugins listed in the official WordPress plugin directory for any keyword. After submitting the search form the results are displayed in a table below and you have the choice to add a plugin as favourite (see above) or install it on the current website. To install several of the plugins in the result simply select their checkboxes, then select one or multiple weblogs you want to install the plugin to in the “Your Sites” list and click “Install on selected Sites” at the bottom of the page.
- From URL: For plugins not listed in the WP plugin directory, e.g. premium plugins you purchased, you can provide a web address (URL) to the plugins .zip file to install it on your websites. After entering the URL simply select the sites you want to install the plugin to from the “Your Sites” list and click the “Install on selected Sites” button. You can also enter multiple URLs at the same time, with one on each line in the form box, to install all those plugins simultaneously.
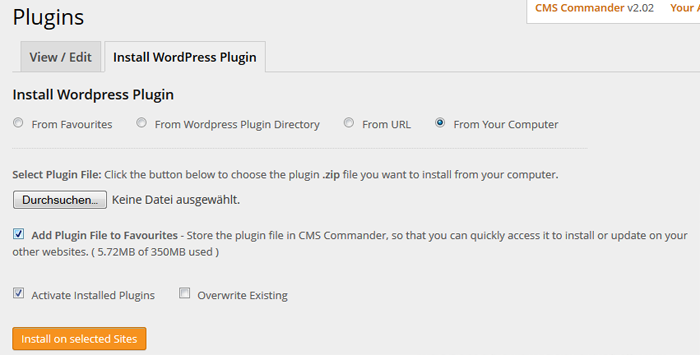
- From Your Computer: This option lets you select a plugin .zip file that you have saved locally to your computer. After selecting the file it will get uploaded and you can install the plugin to any number of your WordPress weblogs simultaneously. If you check “Add Plugin File to Favourites” your .zip file will be stored in CMS Commander to allow you easy access in the future.
For each of the four choices there are two additional settings: “Activate Installed Plugins” tells CMS Commander to immediately activate the new plugin on your blog after installation while “Overwrite Existing” means that a folder of the same name (could be an old version for example) would get overwritten with the plugin you chose to install now.
Once you have selected your plugin file location all you need to do is choose some or all of your websites from the “Your Sites” list to the right and press the “Install Plugin” button. The plugin file will then get bulk installed to all selected WordPress weblogs immediatelly.
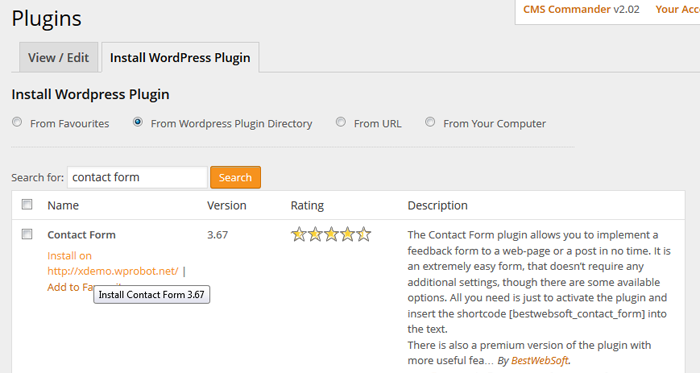
Search results from the WP plugins directory. One of the supported sources for mass plugin installation to multiple weblogs with CMS Commander.
Join Over 3,000 Other Commanders!
Sign up now to start managing all your blogs immediately.
Completely free for 30 days. No payment details required!