The deploy feature in CMS Commander allows you to easily create a new WordPress blog on your server, including pre-configured settings and pre-installed plugins.
You can find the feature by clicking on the “Create Site” link in your account’s main navigation.
The process to deploy a new WordPress site is separated into several steps during which you need to enter the data required for the new site. The steps are explained below:
What You Need
To create a new website with CMS Commander you need the following details:
- A target side address, where you want to install the site to. This can also be a subdomain or subfolder of your existing sites.
- The FTP login (username and password) of your server. These should be provided by your webhost.
- A database for the installation, with database name, username and password. You should be able to create a new database in your webhosts control panel. Here is a tutorial on how to create a new database with cPanel.
To start creating a new WordPress site go to the “Create Site” page in your CMS Commander account.
1. Enter Your FTP Account Details
The first step is to enter the FTP account details of the server where you want to create your new blog. Your FTP username and password should have been provided to you by your webhost or server administrator. If you do not have them please contact your webhosts support for details.
You need to enter the following details:
- Website URL – The exact address of the website you want to set up. For example http://mydomain.com/. If you want to install WordPress to a subdomain enter http://subdomain.mydomain.com. To install WordPress in a folder enter http://mydomain.com/subfolder
- FTP Host – Usually you will be able to leave this setting at the default, unless your webhost has provided instructions that tell you otherwise with your FTP user and password.
- FTP Username – The FTP username as provided by your webhost.
- FTP Password – The FTP password as provided by your webhost.
- Directory – This field is optional. By default CMS Commander will try to install all files to your servers “public html” folder (or similar). If you server has a custom folder structure or you want to install WordPress into a subfolder enter it here. For example enter “folder/subfolder”.
Important: If installing WordPress to a subfolder be sure to enter the same folder in both the “Website URL” and “Directory fields. E.g. to install to “http://mydomain.com/subfolder” enter “subfolder” in the Directory field.
After entering all information click the “Continue” button to go to the next step.
2. Enter Your Database Details
Here you need to enter your database information, just like when you install WordPress directly to your own server.
- Database Host – Leave this at the default value unless your webhost requires otherwise.
- Database Name – The name of the database you want to install WordPress to.
- Database Username – The Database username as provided by your webhost.
- Database Password – The Database password as provided by your webhost.
- WordPress Table Prefix – The prefix used for all WordPress DB tables. You can leave this at the default “wp_” but it can make sense to change it for security reasons. If you have multiple WordPress installs in the same database you need to change this to a unique value.
After entering all values click on the “Check Connection and Continue” button. At this point CMS Commander will try to establish a connection to your FTP server and database to verify the information is correct and everything is working.
3. Enter Your Site Settings
At this point you can configure several default settings for this (and future) new WordPress blogs you set up with the deploy feature.
The following settings are required and are the same as during a normal WordPress installation process:
- Website Title – Enter the title for your site. This can be edited later.
- Admin Username – The login name for the main admin account.
- Admin Password – The password for the main admin account.
- Admin Email – The email address associated with the main admin account.
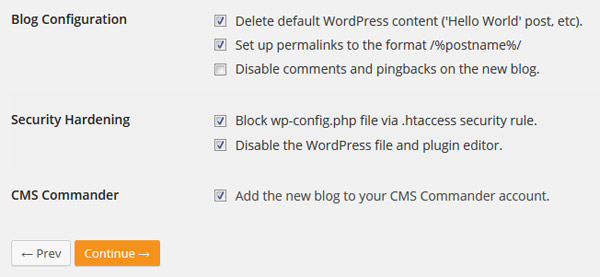
The settings afterwards allow you to change some common WordPress settings. You can…
- Choose to delete all default WordPress content (which you will probably want to do anyways).
- Choose to set up permalinks (pretty links) which is recommended for SEO.
- Choose to enable or disable commenting.
- Add several useful security rules to your new blog.
- Add your site to CMS Commander directly after it has been deployed.

Some of the settings you can configure.
4. Choose Plugins
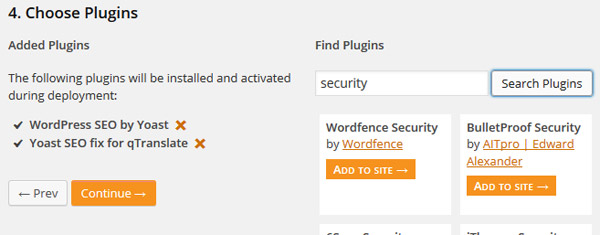
In this step you can select plugins that shall be installed on your new blog.
Simply use the provided search form by entering any keyword you want to search for. The form returns free plugins from the official WordPress.org plugin directory. In the list of results you can click “Add to Site” next to any plugin to add it to your site.

Choose plugins to install on your new site
5. Deploy Site
In the last step you have the choice to save all your settings as a preset template. By doing that you can load them later in order to set up another new WordPress blog with the same or similar settings.
You can create any number of templates. To do so simply enter a name for your template into the “Save Preset” field. You can overwrite an existing template by entering the same name. All your settings are saved with the exception of the FTP, DB and WordPress passwords.
Once you chose a template name simply press the “Deploy Now” button to install WordPress to your server and set up your new site.
Please note the process of setting up your site can take up to several minutes depending on your server and chosen options.
Join Over 3,000 Other Commanders!
Sign up now to start managing all your blogs immediately.
Completely free for 30 days. No payment details required!

