For the automatic backup feature in CMS Commander go to the page titled “Backups” in your accounts main navigation. As the first step you need to create a backup task which defines what files to backup and where to save the results. To do so go to the tab titled “Create Backup Task”. In the form you see there you need to specify the following setting related to your backup task:
- A Task Name, for identification purposes only.
- The Schedule, which defines at which intervals the backup task should be processed automatically. Either daily, monthly or weekly.
- The Backup Time – at which hour of the day (server time) should the automatic task be run?
- If you set “weekly” or “monthly” as schedule you can further specify the Weekday or Day of the Month on which your task should be processed.
- The Type of your task defines what gets backed up: Either the database only or the database plus all files.
- If you set the backup type to “full” you can use the Exclude Folders field to exclude folders on your server which should not be included in the backup files. Some are entered by default and you can specify more as a comma separated list.
- Likewise you can specify additional Include Folders to be added to the backup files. By default only “wp-content” and “wp-admin” are backed up, so this is helpful if you have other important folders created by a 3rd party plugin for example.
- Disable Compression: If checked backup .zip files do not get compressed. This can be necessary on very big sites, where the backup times out otherwise.
- Optimize database tables before backup lets CMS Commander perform some SQL optimize operations prior to backup in order to reduce database size.
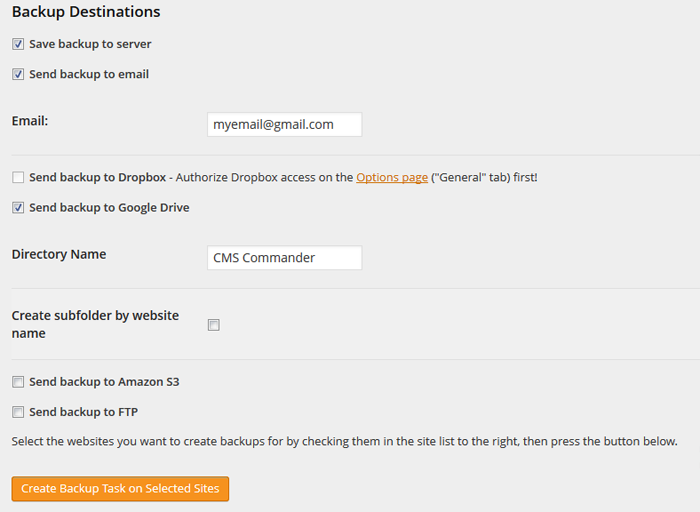
Below the table you can find the Backup Destinations area. Here you choose where you want to have your backup files saved to. You have five choices and can use any combination of those:
- Your Server – If checked the backup file remains on the server of your website which the backup was created for. If unchecked the file there will be deleted and only saved to the other locations of your choice.
- Email – CMS Commander can send the created backups to any email of your choice. After selecting this option you need to enter the email address you want to use.
- Dropbox – Upload the backups to Dropbox, the popular online file storage service. You need to connect to your Dropbox account with the button on the “Options” page first before you can use it here.
- Google Drive – To save backups to the free cloud storage service that is part of every Google account. You need to connect to your Google Drive account with the button on the “Options” page first before you can use it here.
- FTP – Upload the backups to any server by entering your FTP information here. “FTP Address” is the name of your site or server IP, i.e. yoursite.com, “FTP Username” and “Password” are your login details, in the “Remote destination path” field you can specify to which folder you want the backups to be saved on your server and with “Create subfolder by website name” whether a subfolder should be created for each backed up site.
- Amazon S3 – Store your WordPress backups in your Amazon S3 accounts. After checking this option you will be prompted to enter your account details.
After entering all the information you need to select the WordPress websites that you want to back up automatically from the “Your Sites” list on the right side of screen and then click the “Create Backup Task” button.
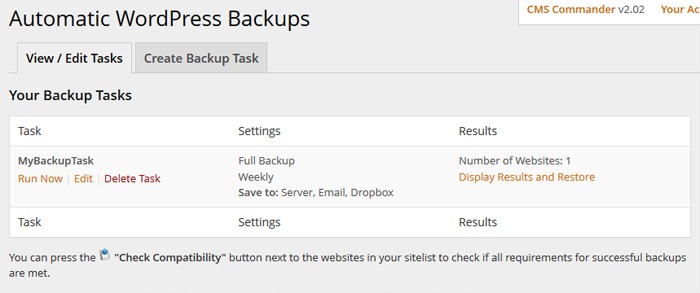
After tasks have been created you can view, edit and delete your backup tasks on the “View / Edit” tab. For each created task you have the option to delete it, edit it or process it now and create a new backup instantly by pressing the links next to its name in the table.
Join Over 3,000 Other Commanders!
Sign up now to start managing all your blogs immediately.
Completely free for 30 days. No payment details required!