This page will give you instructions on how to make your sites ready to use them with CMS Commander and then add them to the software.
1. Install the CMS Commander Plugin on Your Websites
To remotely manage a WordPress weblog inside CMS Commander you first need to install a small plugin to your website. This plugin handles all the communication between your site and cmscommander.com and establishes the secure and encrypted SSL connection.
There are two ways in which you can find and install the CMS Commander plugin on your weblogs:
- a) Installing CMS Commander From The WP Plugin Directory
- Log into your WordPress admin panel and navigate to the “Plugins > Add New” page.
- Enter “cmscommander” in the search field and then press “Search Plugins”.
- You will get one result: “CMS Commander Client”. Press the “Install Now” link next to the name to finish. Afterwards, press activate and you are ready to add your site!
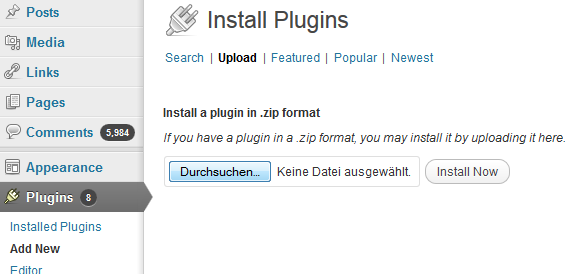
- b) Uploading CMS Commander From Your Computer
- Download the CMS Commander WordPress plugin to your computer
- Log into your WordPress admin panel and navigate to the “Plugins > Add New” page.
- Click “Upload” in the tab bar near the top.
- Browse and select the CMS Commander plugin file on your hard drive. Click “Install Now” to upload it.
2. Add Your Websites to Your CMS Commander Account
After you have installed the plugin on your site you need to add it to your CMS Commander account, which is a quick and easy process.
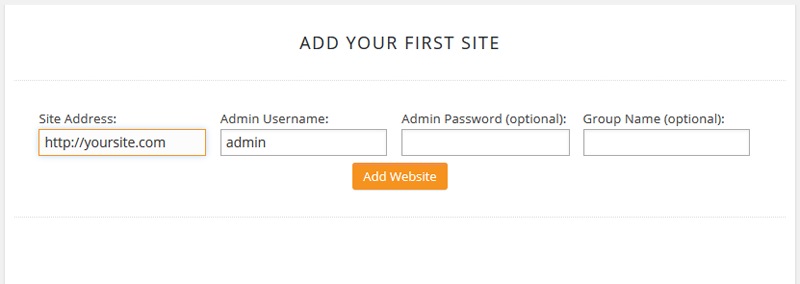
To do this log into your account and then navigate to the “Dashboard” page if you are not already there by default. Click the link saying “Add Website” to open up the form to input your website details. The form consists of the following 3 fields:
- Site Address / URL: The full web address of your site, starting with http://, for example http://mywebsite.com
- Admin Username: Your admin login username (note that your password is never required in CMS Commander!) which you either chose during installation of your CMS or which often is “admin” by default.
- Group Name (optional): If you want to you can specify a group name to categorize your sites better. Simply enter any name of your choice for the group.
After entering those details press the “Add Site” button to finish inserting your weblog into CMS Commander.
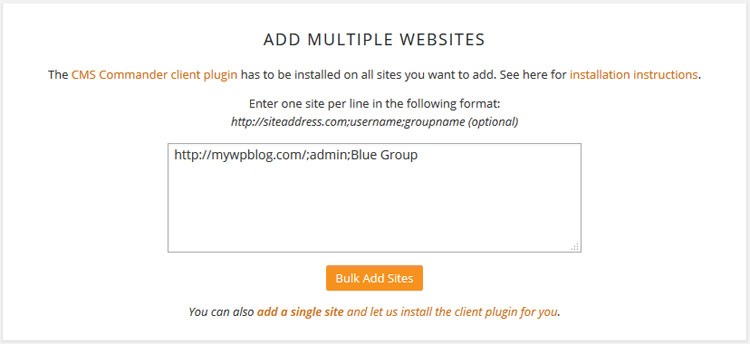
Alternatively you can also import websites into CMS Commander in bulk. To do that click on the “Bulk Add Sites” link near the bottom of the window. In the box that opens up you can enter any amount of websites with one on each line. See the instructions on screen to learn how to format your site input. Please note that the CMS Commander plugin has to be installed on all sites you add.
After adding your first site a new link will show up on your dashboard, called “Your Sites”. Click it to open up an overview of your sites in CMS Commander. Here you can delete websites from your account, edit the group associated with websites and set up uptime monitoring as well as custom plugin branding.
Join Over 3,000 Other Commanders!
Sign up now to start managing all your blogs immediately.
Completely free for 30 days. No payment details required!